11- VM Natural - 011 - Adelice
01 Tube principal
Plugin VM Natural>Plastic Starfish
Plugin VM Natural>Legoland
Plugin AAA Frames>Foto Frame
Efeitos do PSP
Animation Shop
01- Abra uma imagem transparente de 800 X 600px.
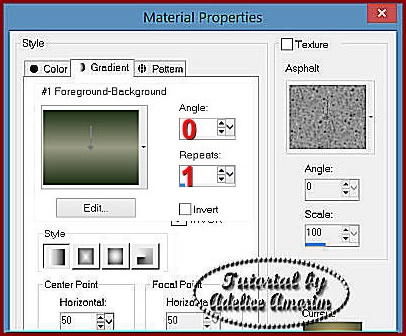
02- Preencha com um Gradiente Linear = 0/1, retiradas do seu tube. Cores Usadas: FORE= #1c2f12; BACK= #9a9c84.
03- Selection All. Copy no tube e Paste Into Selection.
04- Effects>Image Effects>Seamless Tiling.
04- Effects>Image Effects>Seamless Tiling.
05- Adjust > Blur > Radial Blur.
06- Duplique até ficar com 6 Layers.
07- Renomeie Efeito1; Efeito2; Efeito3; Legoland1; Legoland2 e Legoland3.
08- Effects > Plugin > VM Natural > Plastic Starfish.
07- Renomeie Efeito1; Efeito2; Efeito3; Legoland1; Legoland2 e Legoland3.
08- Effects > Plugin > VM Natural > Plastic Starfish.
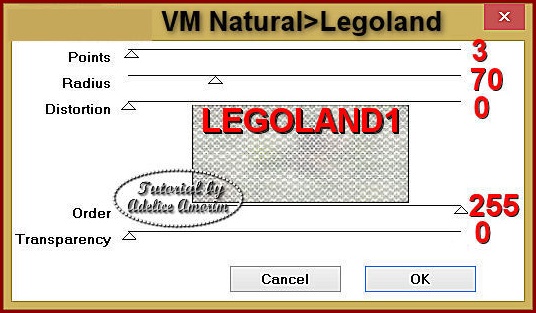
09- Effects > Plugin > VM Natural > Legoland.
10- Adjust > Sharpness > Sharpen More, nas Layers: Legoland1; Legoland2 e Legoland3.
11- Ative a Layer Efeito1.
12- Selections > Selection All > Modify > Contract= 50. Invert.
12- Selections > Selection All > Modify > Contract= 50. Invert.
13- Promote Selection to Layer. Arrange Bring to Top. Renomeie Borda.
14- Effects > Plugin > AAA Frames > Foto Frame Width=50.
15- Repita o Item 14 alterando o Width=25.
16- Blend Mode: Hard Light;
17- Drop Shadow = 10/10/50/20. Repita.
18- Copy no Tube Principal e paste new layer. Renomeie TUBE.
19- Suas Layers deverão ficar na seguinte ordem:
17- Drop Shadow = 10/10/50/20. Repita.
18- Copy no Tube Principal e paste new layer. Renomeie TUBE.
19- Suas Layers deverão ficar na seguinte ordem:
Levando para o AS
20- Feche as layers Efeito2, Efeito3; Legoland2 e Legoland3; copy merged e leve ao AS.
21- Volte ao PSP feche as layers Efeito1, Efeito3; Legoland2 e Legoland3, e abra as layers Efeito2 e Legoland2, copy merged e leva ao AS.
22- Volte ao PSP feche as layers Efeito1, Efeito2; Legoland1 e Legoland2, e abra as layers Efeito3 e Legoland3, copy merged e leva ao AS.
23- Assine e salve.
Crédito
Tutorial: by Adelice Amorim, criado em 03.04.2015
Tube: Mist_Fantasy_Ramirez2_DragonBlu0608.pspimage
Fonte: Agency FB / Respective / Arial
Criação e Formatação: by Adelice Amorim

Coloque sempre sua marca d'água, a marca d'água do(a) autor(a) e os nomes dos autores das imagens que usou
Coloque no "Assunto" o seu nome ou nick, seguido do número e título da aula.
Na parte inferior da mensagem coloque o endereço do tutorial.
20- Feche as layers Efeito2, Efeito3; Legoland2 e Legoland3; copy merged e leve ao AS.
21- Volte ao PSP feche as layers Efeito1, Efeito3; Legoland2 e Legoland3, e abra as layers Efeito2 e Legoland2, copy merged e leva ao AS.
22- Volte ao PSP feche as layers Efeito1, Efeito2; Legoland1 e Legoland2, e abra as layers Efeito3 e Legoland3, copy merged e leva ao AS.
23- Assine e salve.
Crédito
Tutorial: by Adelice Amorim, criado em 03.04.2015
Tube: Mist_Fantasy_Ramirez2_DragonBlu0608.pspimage
Fonte: Agency FB / Respective / Arial
Criação e Formatação: by Adelice Amorim

Coloque no "Assunto" o seu nome ou nick, seguido do número e título da aula.
Na parte inferior da mensagem coloque o endereço do tutorial.


Nenhum comentário:
Postar um comentário
Para se inscrever nas listas clique nos títulos de cada grupo na página inicial. Comece com as aulas de PSP, depois continue com o PSP + AS, e se quiser siga com o Xara e a Formatação para criar belos e-mails.
Deixe aqui suas opiniões e seja sempre bem-vindo(a).